Are you a UI/UX Designer looking to improve the workflow of your designs? Then, don’t worry; we will show you the most effective and best Figma Practices in this post. When you follow these practices in your projects it will surely help you increase your productivity and build your apps faster.
As a designer, maintaining consistency in your design for a particular project becomes very important. For eg: When you use a Spotify App on your iPhone, iPad, or your macOS you will never find any difference in the UI of the screens. Not only Spotify but you will always find this consistency in design in every reputed web app.
This is where Figma Practices are useful to do smart work and save a lot of time. Now there, are lots of other advantages you will find when you’re using Figma. For instance, you can use ready-to-use Figma UI Kits to speed up your workflow as it comes with organized components and UI elements.
Now, without wasting any time, let’s directly jump on to the best practices you should consider while using Figma.
Now talking about the design practice, imagine if Spotify decides to change the design of its play button. Will the Designer work on each screen and each layout to change the design? Hell no!
This is where Figma Practices are useful to do smart work and save a lot of your time. Now, there are lots of other advantages you will find when using these best figma practices.
So without wasting any time, let’s directly jump on to the best practices you should consider while using Figma!
Best Figma Practices
We have selected those practices which can be used in often coming tasks in your design project. Therefore, let’s get started!
Using an Auto Layout
Auto Layout is one of the best Figma Practices that is found very useful to Figma Designers. It is a property that lets you create designs that change size based on the content you add or remove. Now, this practice is very useful when you need to add or remove your content after you design the element.
Therefore, no need to resize your design element or padding with the auto layout you can easily add new layers, accommodate longer text strings or maintain alignment as your designs evolve.
Now, you can add auto layout to a frame or a selection of objects such as frames with existing content, Components, component sets, Groups, or other selections of layers and/or objects.
Furthermore, to use auto layout to a selected frame you can use the Shortcut ‘Shift +A’ or right-clicking on a frame or object and select ‘Add Auto layout’.
Using Layer Outlines Figma Practice

Outline layers are very useful when it comes to holding strokes or finding edges for filled shapes. This practice allows defining the border or contour of an object or shape and helps you to separate it from its fill colors.
In addition, you can customize these outline layers in terms of color, weight, and style, providing a visual frame and helping to distinguish objects within a design composition.
To use this practice figma then from the toolbar click the Zoom/View option then click Outlines > Show Out outlines. After that, select if you’d like to Include hidden layers and Include object bounds.
Furthermore, If you’re used to using Keyboard Shortcuts then you can also try this ⌘ Command / ControlY or ⇧ ShiftO then, ⌘ Command / Control/ to search outline in the quick actions menu.
The practice of Organizing.
If you’re designing an application or a website it included lots of components and design elements. Now, you know the design well but when it comes to explaining your design to your team members and client it can be confusing.
Therefore, defining and documenting the components of your design makes it easier for your team as well as, for you to understand the design. In addition, it will also make it easier to find components in the Asset panel.
You can name your components in a particular way as well naming multiple layers with a group. Now, in the above example of a Dashboard UI Kit you can see how perfectly they have organized the components. In addition, it has a consistent naming convention, that allows you to search and import easily.
Use Constraints to do Effortless Resizing
Now, constraints are mostly used when you want to control how your designs will look on multiple screens. This Figma practice helps to tell figma how a particular layer should respond when the size of the frame is changed.
In addition, Constraints can be applied to any layer that is within the frame. Therefore, you can not apply constraints to a layer that is outside the frame. Now, using this constraint is very easy. When you create a frame and place an element inside the frame you can see a constraint box on the left side of the panel.
For reference, you can check the above example of a Figma UI Kit where the constraints are used in a blog card.
This box is sectioned with horizontal and vertical lines by which you define how a layer should behave as you resize it. Now, horizontal deals with the x-axis whereas vertical deals with the Y-axis.
Furthermore, to use constraint you can check this official tutorial video from Figma.
Flow Charts and Starting Points in Prototyping
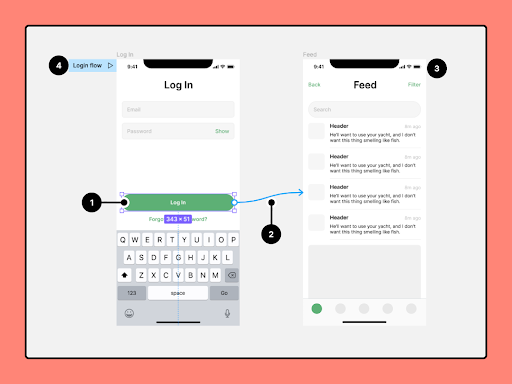
As a designer, I think one of the best USPs of Figma is its Prototyping Feature. It allows you to create interactive prototypes as you can create flow charts using the frames. It helps the designer to explore how a user may interact with the design they have created.
Using this figma practice you can create multiple flows for your prototype and show the connection between frames by creating a flow starting point. Moreover, there are many ways to add a flow starting point to your prototype.
You can click ‘+‘ in the Flow Starting point section of the right sidebar by selecting the starting frame. Also, Right-click on the frame, then click Add starting point.
Using Styles In Figma
As I have mentioned earlier in the post giving the Spotify example, using styles in figma can be very useful for such cases. It can be used to define the color, text, and any effects applied to objects. Also, it can be used to define the structure and appearance of layout grids.
So whenever, you make changes to style properties for eg. changing the size of the play button. Figma will automatically apply those changes to any objects using that style.
Now, you can create styles for Paints and colors, Text, Effects, and Layout Grids. To use styles there are different guides available on Figma. Like using Styles on Text layout Grids, Layers and Objects, and many more.
Publishing your Styles and Components

Ever wonder when you have to create the same design cards for multiple frames and projects? What if you can create templates of those same designs which you can reuse as per your design needs? This figma practice can help you save lots of time in the designing process.
When you create components and styles you can reuse them in the same file or project. On the other hand, when you publish a style or component it is saved in your library that can be easily shared with others.
Moreover, to publish styles and components you can select the dropdown from where you rename your file. Then you can select Publish styles and components and select which components you want to add from the Asset panel in your library.
Set Custom Thumbnails
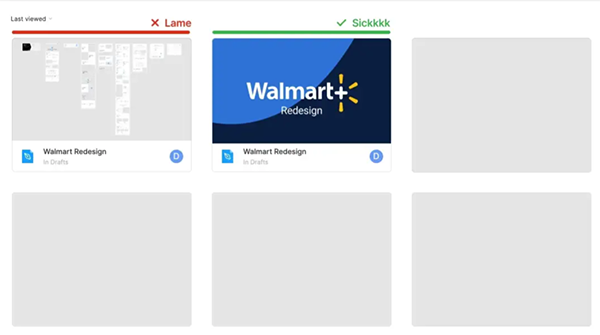
Every design file in Figma has a thumbnail that gives you a sneak peek of its contents. This thumbnail appears wherever the file is located in the file browser, making it easy for you to find what you are looking for.
By default, Figma creates the file thumbnail based on the contents of the first page in the file. This means that when you look at the file in the file browser, you can get a quick overview of what’s inside. However, there may be instances where you want to show a different view or representation of your design as the thumbnail. That’s where the “Set as thumbnail” setting comes in.
To use this, all you have to is open the design file and find the frame you want to use as a thumbnail. Then, right-click on the frame in the canvas and Select ‘Set as thumbnail’.
Loom
So Loom is one of the tools you can consider using with figma that allows you to record your screen and camera. It is useful to send quick videos when calendars won’t line up and you don’t have time to type a wall of text.
Furthermore, its loom is very useful when you’re working remotely and it can save you a lot of your time in your meetings.
Conclusion
So there we go, these are some of the best practices you need to consider while using Figma. These practices can surely help you to increase your productivity and save a lot of your time in designing with Figma. These practices are handpicked by trusted designers which they find very useful while designing interfaces.
Now, when it comes to an individual learning these figma practices it will all depend on the practical. As you will start implementing these on your live projects you will get your hands on them. In addition, Figma has great space for creativity, the more you create the more you will learn.
We’d recommend you to check the Figma tutorials and Blogs where they come up with lots of tips and tricks. If you find these figma practices useful please do share them with your friends.
Happy Designing! Cheers