The stars are beautiful to look at and even more beautiful to photograph. We take an in-depth look at how to do so with this complete guide to astrophotography.
We humans have been looking at the sky in wonder since the dawn of time.
And if you’ve seen these amazing astronomy photos, you may even be wondering how to get your own gorgeous images of the night sky.
You’ve come to the right place. We’re breaking down everything you need to know about astrophotography, from the different types to the gear you need to how to plan your astrophotography shoot.
What is Astrophotography?
First, let’s cover the basics: what is astrophotography?
Essentially, astrophotography is the fine art of taking a picture of an object in space, whether that object is the sun, the Milky Way, or a distant planet.
However, it’s a little more complicated than just pointing your camera and snapping an image. There’s a lot of factors to consider if you want to see more than just a pitch black sky.
Types of Astrophotography
Before we go into how to shoot astrophotography, let’s talk about the various types of astrophotography, as the type of photography will help determine how you set up your shoot and the equipment you need to shoot properly.
Deep Space/Sky
Deep space or deep sky photography involves photographing objects far away in the night sky. This is the type of photography that captures far-off nebulae and distant galaxies. Due to the nature of the images, this is one of the most technically complex forms of astrophotography.
It requires the use of a telescope, and successful deep space photography must account for light pollution, overcoming star trails, and particular editing software.
Solar System
Solar system photography accounts for everything within our own solar system, such as our moon, sun, and the planets that make up our solar system.
You can use a telescope since you don’t need to shoot so far into space. You can also use a variety of telephoto lenses for great results.
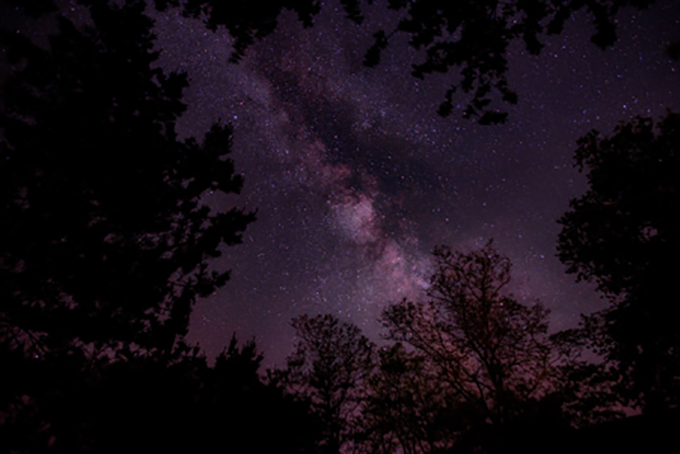
Wide Angle
If you’ve ever seen landscape images of the night sky, you might be thinking of wide-angle astrophotography, including images with the Milky Way in the background. This is a great way to get photographs with a lot of visual definition.
Due to the nature of the images, you have to use a wide-angle lens or super-wide lens to capture images. That said, it’s among the least technical varieties of astrophotography.
Time-Lapse
Finally, there’s time-lapse photography, which is a subset of wide-angle photography.
Basically, you’re taking several exposures over a period of time and layering them over one another to create a composite image. If you’ve ever seen star trail photos, time-lapse is a great technique to use.
Gear You Need
Once you know the types of astrophotography (and have a general sense of the types of images you’re most interested in capturing) you can start to get a sense of the type of gear you’ll need.
In general, you’ll need a few common pieces of equipment:
- A high-quality camera
- A telescope
- A high-quality lens
- A tripod
Let’s break it down.
Best Astrophotography Camera
Regardless of the specific type of camera, you’re going to need a camera with a manual mode setting. This will allow you independently adjust certain features to get a certain photograph, including ISO, aperture, and shutter speed.
This usually means that you’ll need a DSLR camera, which is designed with advanced photographers in mind.
For astrophotography, in particular, you’re going to want a camera that performs well as ISO ratings between 1600 and 6400.
You’ll also need a remote release, which is a cable that allows you to release the shutter remotely for photos with an exposure time longer than 30 seconds. This helps minimize shakiness in the camera so that photos can come out clear.
With that in mind, you should also invest in a tripod–not one of the cheap ones. A cheaply built tripod will move slightly during a long exposure time, which ruins photos. Look for a sturdy, well-built tripod using ball heads and L-brackets.
Best Lens for Astrophotography
It’s not enough just to have a good camera and a good tripod. You’ll also need a good lens.
After all, the lens is how the camera sees the image!
It’s a good idea to invest in a quality wide-angle lens, ideally one that has a f/2.8 minimum aperture. The aperture is a hole in the lens through which light travels. The smaller the aperture, the wider the lens can open allowing more light in.
For full-frame cameras, a wide-angle lens between 14mm and 20mm are ideal, while crop sensor cameras work best with a lens between 10mm and 17mm. Either way, go for a camera that can drop the aperture as low as f/2.8 to f/4.
You may also want to invest in a telephoto lens, which is basically a lens designed for taking photos from a great distance. This particular lens is highly susceptible to shake, so it must be used with a good tripod.
Best Telescope for Astrophotography
You may also want to invest in a telescope, especially if you hope to do deep space photography.
If you do want to use a telescope, you’ll need to purchase an adaptor so that your camera can properly photograph what the telescope sees. Check out TelescopeObserver for a breakdown of some of the best telescopes for use in astrophotography.
Camera Settings
Once you have your camera, we can talk about some of the settings you should use before you set out to capture the night sky.
The first thing is that you should go to program mode and set it to Manual. This will allow you to independently manipulate each aspect of how the camera takes the photo.
And yes, that means turning off Autofocus. Or set it to Manual. Either way, lose Autofocus, it’s going to cost you a lot of great images. And while you’re at it, set your exposure compensation to zero and turn off autoexposure.
You also need to account for white balance, since you’ll be photographing dark skies (white balance is simply telling the camera what white is so it knows how to interpret other light coming in as light, dark, color, etc.) Set it to Daylight or use a custom white balance with a modified camera.
As we mentioned earlier, ISO should be set between 1600 and 6400.
Next is shutter speed, which is vital in determining how your image turns out since it tells the camera how long the shutter is open to expose an image. Exposures up to 30 seconds can usually be dialed in directly, but for exposures longer than that, you’ll have to set it to Bulb.
You’ll also need to use the remote release. If you don’t have one, use the camera’s self-timer to trip the shutter so you don’t have to touch the camera to take the photo. This will minimize vibrations and star trailing (if you’re not trying to capture star trailing).
Finally, there’s the question of JPEG vs Raw. Most DSLR cameras come with JPEG as the default. What most people don’t know about JPEG is that it condenses the photo file down every time you edit and re-save the image, which means you lose data (and photo quality) over time.
Instead, set your file format to Raw, which preserves all original data as it comes to the camera sensor in high bit depth.
Planning Your Shoot
So, you know the intricacies of equipment and camera settings. Ready to shoot your first galaxy?
The Photographer’s Ephemeris
The first thing you need is the Photographer’s Ephemeris, which is a map-centric sun and moon calculator. Basically, it shows you how light will fall on land, day or night, at any location on Earth.
Which is pretty cool, and also pretty useful if you want to photograph the night sky.
It also provides to-the-minute sunrise, sunset, moonrise, moonset, and twilight times for specific locations.
So basically, it’s the astrophotographer’s Bible.
Capturing a Static Star Field
Now, let’s say you want to capture a static star field.
Tragically, this requires some math.
Thankfully, the math is fairly simple: use the rule of 600. You need to know the focal length of your lens (in millimeters) and divide 600 by the mm length of your lens. The resulting number is the maximum number of seconds you can expose a shot.
Keep in mind that there’s very little light in the night sky, which is why you need a lens with a wide aperture capability to make the most of those precious seconds.
After that, capturing a static starfield is relatively easy: just point and shoot. The trickier part is composition.
Capturing Star Trails
Let’s say you want to capture star trails instead.
We’ve spoken a lot about trying to avoid star trails, but they’re actually one of the more accessible forms of astrophotography, especially if you have a camera that doesn’t perform well at higher ISO ratings.
In fact, you’re going to set your ISO as low as possible to reduce noise. Just take a few test shots at a higher ISO first.
To do this, calculate the movement of the stars so you know which direction your star trails will go. This is often dependent on where you live relative to the poles.
You’re going for shots with an exposure time between 30 seconds and 4 minutes with no gap between shots, which makes a remote release vital. If you have an intervalometer, this is a great tool to take multiple shots over time.
Hint: you’re going to take several long-exposure shots and stack them together, rather than a single super-long exposure shot. During super-long exposures, the sensors often create what’s known as hot pixels, resulting in speckly images.
Learn More About Photography
Who needs the Hubble Space Telescope when you’ve got your own ingenuity, a great camera, and a deep love of astrophotography?
If you’re a photography aficionado (or an aspiring hobbyist) and you want to learn more, check out our blog for all kinds of tips and tricks, like these digital photography lighting tips or this article explaining the amazing art of photography.
And if you can’t wait to learn more about your favorite subjects, check out our course catalog to find the perfect course for your new obsession.